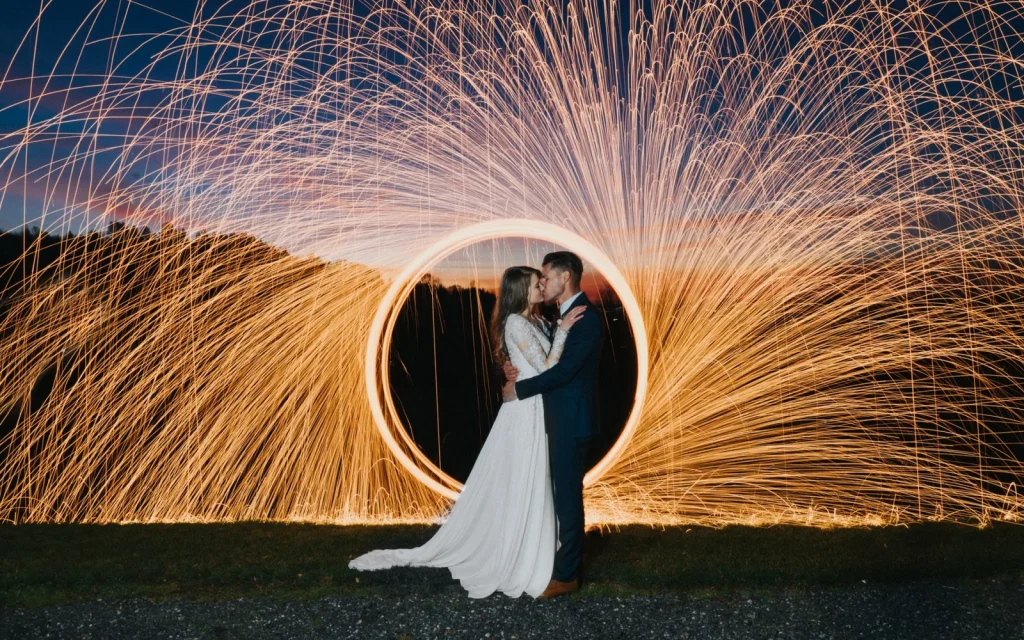
I think my favorite reaction from clients are the gasps that I receive when looking at any long exposure steel wool photograph. I am immediately asked, “Oh my! What is that?”, “How did you do that?”, or my favorite, “Is that photoshop?” Steel wool Wedding Tutorial
Short answer: no it is not photoshop, its real fire produced by steel wool!
Before diving into steel wool photography, let’s cover some camera basics. A camera’s three main adjustable settings are aperture (f-stop), shutter speed, and ISO. For steel wool wedding photography, the key focus is on the shutter. The shutter controls how long the sensor is exposed to light, affecting brightness and motion blur. A slower shutter captures stunning light trails, making steel wool photography a creative and dynamic wedding photography technique. Mastering this technique adds a magical touch to wedding shots. Want to learn more? Check out this steel wool wedding tutorial!
Now onto how I actually get the picture!
For those who don’t know, steel wool is a bundle of very fine strands of steel-filaments most commonly used to polish metals, and boy is it highly flammable. In essence, what I am doing is lighting it and spinning it very fast to produce flying sparks. So if I want a streak of a spark, all I have to do is make my shutter stay open longer! But you might wonder, how do I get it spinning? You need six things: this Steel Wool Wedding Tutorial!
- A metal whisk
- A string, about 2 feet long
- Steel wool, make sure it is fine steel wool, grade 0 or 00
- A flash, or something that can produce a quick amount of bright light quickly
- Tripod
- A lighter
With these six things, you are almost ready to take your picture. Before you go out for pictures, tie your string to the handle of your whisk and make sure it is easy to spin. Once on location, you want to get a good background for a steel wool picture, so pick something that is bright and visible at night. It should be dark outside, but you want to be able to see the background, or else you’ll just have black emptiness. If you look above at my pictures, I make sure to include the sunset, the city, waterfall, or a ferry. Once you have your background, set up your camera on a tripod with a shutter of about 3 seconds. I usually don’t go higher than this because it is almost impossible for the couple to stand absolutely still longer than this. Set up the flash on your camera pointed directly at the couple. Once these things are done, mess around with the settings on your flash and in your camera until you get a picture that is exposed properly. Take test shots without the steel wool, it will give time for the couple to practice standing still and can let you see the exposure. Next, stuff some steel wool into your whisk and get behind the couple. Make sure to stand 3 feet back so that sparks don’t hit the actual couple. Stress to them how important it is to stand still and light up your steel wool. Once it is slightly lit, have someone either click the shutter for you (a friend, assistant, or self-timer) and start to spin. The sparks will start flying in a massive circle around your couple. Make sure to safely extinguish the remaining steel wool in the whisk and go enjoy the picture you just took!
You should be getting exclamations from the couple and all their friends as you show them the awesome picture you just took. To them, its magic, while for you it was just some handy camera work!